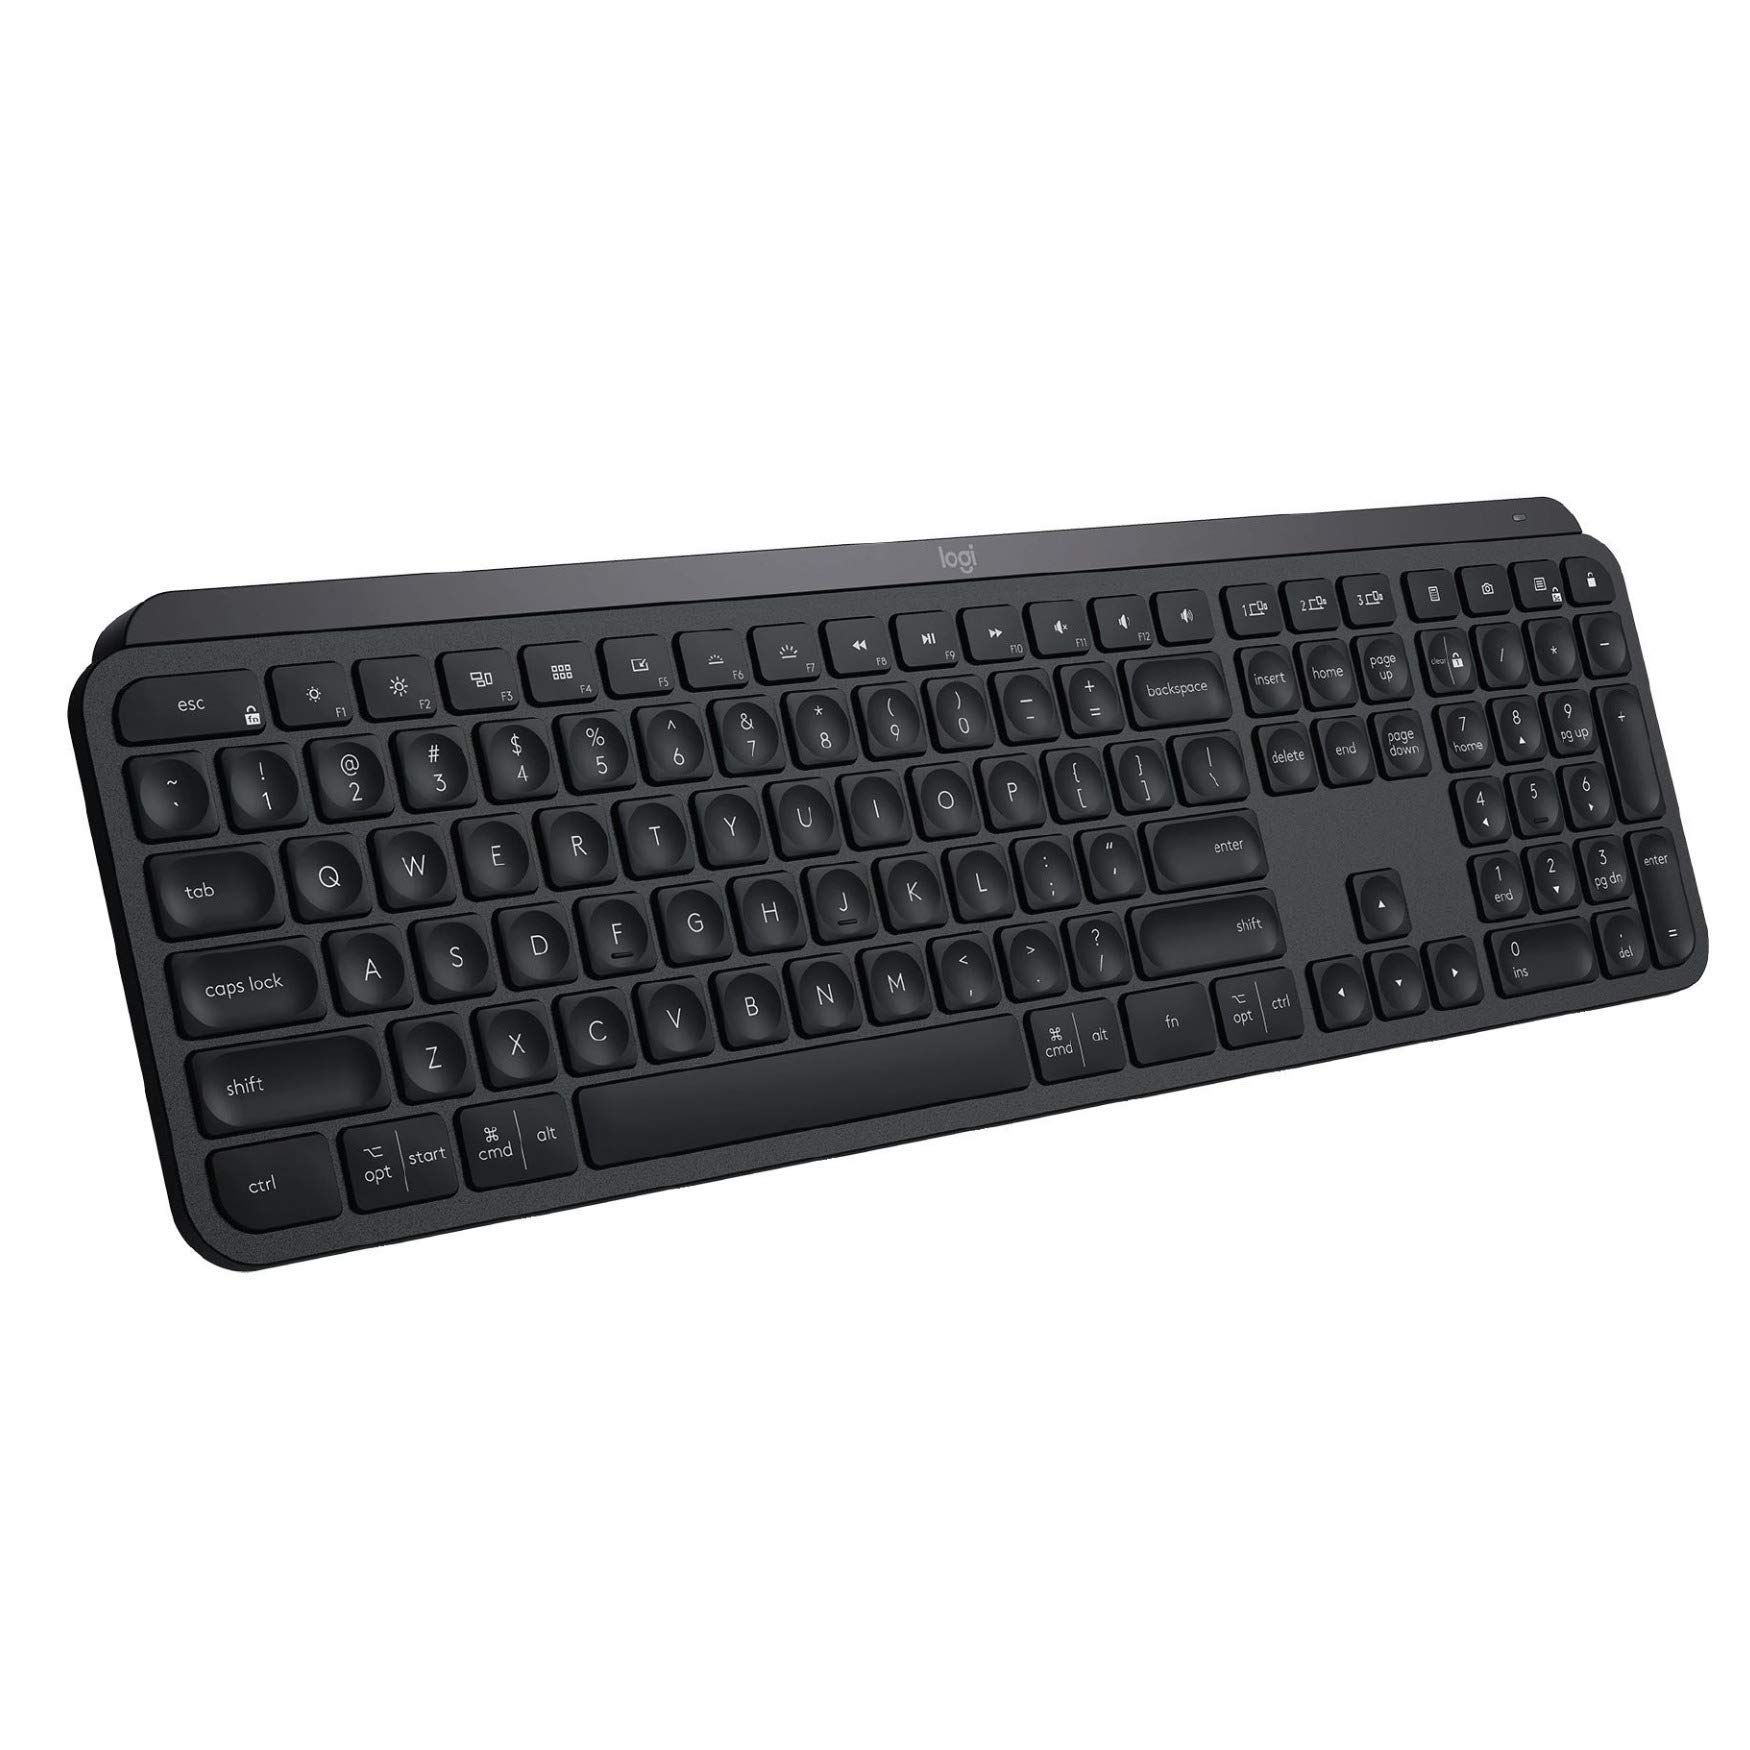
Team Orientation Guide

Get started with your
MX Keys & MX Master 3S

Everything the Resolution Therapeutics team needs to set up, pair, and master your Logitech keyboard and mouse — in one place.

Logitech MX Keys Keyboard
MX Keys Keyboard
Logitech MX Master 3S Mouse
MX Master 3S Mouse
⚡ 5-min Setup 🖥️ Windows & macOS 📡 Bluetooth & USB Receiver 🔗 3-Device Multi-Pairing 🔋 Up to 70-Day Battery

⌨️

MX Keys — Keyboard Guide

A full-size wireless keyboard with smart backlighting, multi-device pairing, and OS-adaptive keys.

MX Keys Keyboard Layout Diagram
MX Keys keyboard — annotated overview. Numbers correspond to the feature list below.

Key Parts at a Glance

1

Logi Bolt USB Receiver

The nano USB receiver that plugs into your computer. Provides a secure, stable 2.4 GHz wireless connection. One receiver can pair both keyboard and mouse simultaneously.

2

Bluetooth

Alternative connection method — no USB receiver needed. Connect directly to any Bluetooth-enabled computer, tablet, or phone. Useful when no USB port is available.

3

Monitor / Laptop Brightness

Two dedicated keys to increase or decrease screen brightness on your monitor or laptop display. Works natively on macOS and Windows (with Logi Options+ installed for full compatibility).

4

Keyboard Backlight Brightness

Two keys to increase or decrease the keyboard's backlight intensity. Adjust to suit your environment — brighter for dim rooms, lower for bright offices. There are eight backlight levels available.

5

Speech, Emoji & Mute

Three dedicated shortcut keys: Dictation / Speech-to-text (activate your OS voice input), Emoji picker (open the emoji panel), and Microphone Mute (mute/unmute your mic during calls). Ideal for video conferencing.

6

Easy-Switch Keys (1 – 2 – 3)

Three numbered device-switching keys on the top-right of the F-row. Short press to instantly switch to a paired device. Hold 3 seconds to enter pairing mode for that channel. Connect up to 3 computers and switch between them in one keystroke.

7

Ambient Light Sensor

Reads the brightness of the room and automatically adjusts keyboard backlighting to the appropriate level. Backlighting is reduced or turned off in bright environments to save battery. Proximity sensors also detect approaching hands and wake the backlight.

8

ON / OFF Switch

Slide switch on the top-right edge of the keyboard. Slide toward the green dot to power on. The LED on Easy-Switch key 1 blinks rapidly when the keyboard is in pairing mode. Turn off when not in use to preserve battery.

9

Caps Lock Key

Standard Caps Lock key. When active, the Caps Lock LED on the key illuminates. Press once to enable all-caps typing; press again to disable. Useful for headings, acronyms, and form fields.

10

Windows / Command Key

The Windows key (PC) and Command ⌘ key (Mac) — both labelled on the same key. Used for OS-level shortcuts: Win+D to show desktop (Windows), or Cmd+Space to open Spotlight (macOS). The keyboard auto-adapts to your OS.

11

Space Bar

Full-width space bar with Perfect Stroke spherically dished keycaps that match the natural curve of your fingertips for a comfortable, accurate keystroke and reduced fatigue over long typing sessions.

12

Fn (Function) Key

Hold Fn with a top-row key to trigger the standard F1–F12 function instead of the media action. Press Fn+Esc to permanently swap between Media Keys mode and F-Keys mode — a notification will confirm the switch.

13

Arrow Keys

Full-size dedicated arrow keys for navigation, text editing, and cursor movement. Use with modifier keys for power shortcuts — e.g. Ctrl+ (Windows) or Cmd+ (macOS) to jump word by word.

14

Numpad

Full integrated number pad on the right side. Ideal for data entry and calculations. The numpad keys also double as navigation keys (Home, End, Page Up/Down, Insert, Delete) when Num Lock is off.

Function Row — Default Media Key Actions

KeyDefault (Media) ActionWith Fn
F1🔇 Mute / Unmute MicF1
F2🎤 DictationF2
F3😀 Emoji PickerF3
F4🖥️ Mission Control / Task ViewF4
F5🔍 Spotlight / SearchF5
F6📸 Screen CaptureF6
F7⏮️ Previous TrackF7
F8⏯️ Play / PauseF8
F9⏭️ Next TrackF9
F10🔇 Mute VolumeF10
F11🔉 Volume DownF11
F12🔊 Volume UpF12

Press Fn + Esc to permanently swap between Media Keys and F-Keys mode.


🖱️

MX Master 3S — Mouse Guide

All 10 buttons and features — photo reference and full description table.

Logitech MX Master 3S Mouse — annotated diagram with button numbers

Every button and feature on the MX Master 3S — numbered and described in full.

# Button / Feature What it does
1 MagSpeed Scroll Wheel
Auto-shifts between precise ratchet mode and hyper-fast free-spin. Scroll slowly for line-by-line control; scroll fast to fly through long documents.
2 Mode Shift Button
Small button just below the scroll wheel. Manually toggles between ratchet and free-spin scroll modes without needing to scroll fast.
3 Gesture Button
Hold and move the mouse Up / Down / Left / Right to trigger gestures. Default: Up = all windows, Down = desktop, Left/Right = switch workspace. Fully customisable in Logi Options+.
4 Thumb Wheel
Horizontal scroll wheel under your thumb. Scroll left/right through wide spreadsheets, timelines, and panoramic views. Reassignable per app in Logi Options+.
5 Battery Status LED
Green = 11–100% charge. Red = 10% or below. Check exact percentage in Logi Options+. Full charge lasts up to 70 days.
6 USB-C Charging Port
Front edge of the mouse. Use the included USB-C cable to charge. Works while charging. Just 3 minutes gives a full day of use.
7 On / Off Switch
Slide switch on the underside. Slide toward the green dot to turn ON. Turn off overnight to preserve battery life.
8 Darkfield 8000 DPI Sensor
Precision optical sensor on the underside. Tracks on virtually any surface including glass. Adjust DPI (200–8000) in Logi Options+.
9 Easy-Switch Button
Underside button to switch between up to 3 paired computers. Short press cycles channels 1–2–3. Hold 3 sec to re-pair the current channel.
10 Back / Forward Buttons
Two stacked buttons on the left side, operated by your thumb. Default: browser/file explorer back & forward. Fully reassignable in Logi Options+.

🕹️ Gesture Controls

ℹ️

How to use gestures

Hold the Gesture Button (button 3, on the left side of the mouse) and move the mouse in one of four directions. Each direction triggers a different action — all fully customisable in Logi Options+.

⬆️
Gesture Up

Default: Show all windows / Mission Control

⬇️
Gesture Down

Default: Show desktop

⬅️
Gesture Left

Default: Switch to previous workspace

➡️
Gesture Right

Default: Switch to next workspace

🖱️
Button Click

Default: Middle click (open link in new tab)


🖥️

Humanscale M8 — Monitor Arm Guide

Understand every axis of motion and how to adjust your dual monitor arm for the perfect ergonomic setup.

ℹ️

About the Humanscale M8

The M8 is a premium monitor arm that holds your screen in position using a weight-compensating metal spring — no levers, no locks. The arm floats effortlessly and stays exactly where you leave it. It supports single monitors up to 28 lbs (12.7 kg), or dual monitors up to 12.5 lbs (5.7 kg) each with the crossbar accessory. It carries a 15-year warranty.

Range of Motion — All Axes

Humanscale M8 Monitor Arm — range of motion diagram showing tilt, pan, rotation and height adjustment
Humanscale M8.1 — full range of motion across all six axes of adjustment.

Six Axes of Adjustment

Axis Range How to Adjust
↕ Height (Vertical) 10–11.5" of travel
Min 9" · Max 19" above desk
Simply push the monitor up or down — the spring counterbalance holds it in place automatically. No levers or locks needed.
↔ Depth (Reach) Up to 22" forward reach Pull the arm toward you or push it away at the elbow joint. The arm folds and extends smoothly.
↺ Pan (Left / Right Rotation) 360° at the base post Rotate the entire arm left or right at the post. Use Smart Stop (see below) to limit rotation range if needed.
↗ Tilt (Screen Angle) +80° / −15° tilt Tilt the screen forward or backward at the monitor head. Adjust the tilt friction screw with a hex key (Allen key) to set resistance.
⟳ Screen Rotation (Portrait / Landscape) 360° at the VESA bracket Rotate the monitor head 90° to switch between landscape and portrait orientation. Ideal for coding, reading long documents, or video calls.
⇄ Dual Monitor Pan (Crossbar) 21" left / right pan per head Each monitor head on the crossbar can be independently panned left or right. Angle both screens slightly inward toward you for comfortable dual-monitor use.

Step-by-Step: Setting Up Your Position

1

Set the Spring Tension First

Before positioning your monitor, set the arm tension to match your monitor's weight. Use the hex key (Allen key) to turn the tension screw inside the upper arm.

💡 Turn clockwise for heavier monitors · Turn counter-clockwise for lighter monitors. The arm should hold its position without drifting up or down.
2

Adjust the Height

Sit in your normal working posture, then push the monitor up or down until the top of the screen is at or just below eye level. The spring will hold it in place — no locking required.

💡 Your eyes should naturally rest on the top third of the screen. If you're looking up, lower the monitor.
3

Set the Depth (Distance from You)

Pull or push the arm at the elbow joint to position the screen at roughly arm's length away — approximately 50–70 cm (20–28") from your eyes. Closer is fine for smaller screens; further back for larger displays.

⚠️ Screens placed too close cause eye strain. If you find yourself leaning in to read text, move the screen back and increase font size instead.
4

Pan Left / Right

Rotate the arm at the base post to centre the screen directly in front of you. For dual monitors, angle each screen slightly inward — typically 15–30° — so both screens are equidistant from your eyes.

💡 Use the Smart Stop feature to set a physical rotation limit, preventing the arm from swinging past the edge of your desk or into a colleague's space.
5

Tilt the Screen

Tilt the screen backward slightly — a 10–20° backward tilt reduces glare and neck strain. Adjust the tilt friction screw at the monitor head with the hex key to set how much resistance the tilt has.

💡 Tighten the friction screw if the screen droops forward under its own weight.
6

Rotate to Portrait (Optional)

To switch a monitor to portrait orientation, rotate the VESA bracket 90° at the monitor head. Portrait mode is ideal for reading long documents, coding, or video calls. Remember to rotate the display output in your OS display settings too.

💡 Windows: Right-click desktop → Display settings → Orientation → Portrait. macOS: System Settings → Displays → Rotation → 90°.

Dual Monitor Setup Tips

👁️

Equal Distance

Position both screens so they are equidistant from your eyes. Angle them inward 15–30° each so you're not turning your head excessively.

📐

Matching Heights

Set both monitors to the same height so the top edges are level. Mismatched heights cause neck strain over time.

🖥️

Primary Screen Centre

Place your primary monitor directly in front of you and the secondary monitor to the side. Avoid placing both screens equally to the left/right if you use one more than the other.

🔆

Match Brightness

Set both monitors to the same brightness and colour temperature. Mismatched screens cause eye fatigue when switching between them.

🔌

Cable Management

Route all cables through the arm's built-in cable channels — there are clips along the arm body. This keeps the desk tidy and prevents cables from restricting arm movement.

⚙️

Smart Stop

Set the Smart Stop rotation limit on the arm to prevent it swinging into your neighbour's space or off the edge of the desk. Adjust by rotating the stop collar at the base joint.

🏥

Ergonomic Quick Check

Once your monitors are positioned, run through this quick check: (1) Sit upright with feet flat on the floor. (2) Your elbows should be at roughly 90° when typing. (3) The top of your screen(s) should be at or just below eye level. (4) Screens should be at arm's length — not closer. (5) No glare or reflections on the screen surface. If anything feels uncomfortable after 30 minutes of use, re-adjust.


📡

Pairing Your Devices

Two connection methods available — choose what works best for your setup.

Recommended for most team members

Logi Bolt provides a more stable, secure connection than standard Bluetooth — ideal for open-plan offices with many wireless devices.

1

Plug in the Logi Bolt USB Receiver

Insert the nano-receiver into any available USB-A port on your computer. It's small enough to leave plugged in permanently.

💡 Use a USB hub or the back of your monitor if you want to keep the desk tidy.
2

Turn on your keyboard and mouse

Slide the ON/OFF switch on both devices. The LED on the keyboard's Easy-Switch key 1 will blink rapidly, indicating it is in pairing mode.

3

Install Logi Options+ and pair

Download Logi Options+ from logitech.com/options. Open the app, click Add Device, and follow the on-screen instructions to pair both devices to the same receiver.

💡 One Bolt receiver can host up to 6 devices — pair both keyboard and mouse to a single receiver.
4

Confirm connection

The LED on both devices will stop blinking and remain steady. You're ready to go!

⚠️

Good for laptops or when no USB port is available

Bluetooth works well for most users. In busy wireless environments, Logi Bolt may provide a more reliable connection.

1

Turn on the device

Slide the ON/OFF switch. The Easy-Switch key 1 LED will blink rapidly — the device is in pairing mode.

⚠️ If the LED is not blinking, hold the Easy-Switch key for 3 seconds to enter pairing mode.
2

Open Bluetooth settings on your computer

Windows: Settings → Bluetooth & devices → Add device → Bluetooth
macOS: System Settings → Bluetooth → Click "+" to add device

3

Select the device from the list

Look for "MX Keys" or "MX Master 3S" in the available devices list and click to pair.

4

Pair to additional devices (optional)

To use a second device, hold Easy-Switch key 2 or 3 for 3 seconds, then repeat the Bluetooth pairing process on that computer.

💡 Short press Easy-Switch keys 1, 2, or 3 to instantly hop between your paired computers.

🔀 Multi-Device Pairing — How It Works

⌨️🖱️
Your Devices
1️⃣
Work PC
2️⃣
Laptop
3️⃣
Tablet / iPad

Press Easy-Switch keys 1, 2, or 3 to instantly switch which device you're controlling — no lag, no re-pairing.


⚙️

Logi Options+ Software

Unlock the full potential of your devices — free to download for Windows and macOS.

⬇️

Download Logi Options+

Visit logitech.com/options — free for Windows 10/11 and macOS 11+. Install on every computer you use with these devices.

🎛️

Customise Every Button

Remap any key or button to shortcuts, macros, app-switching, or system actions.

📱

App-Specific Profiles

Automatically switch button assignments when you open specific apps (e.g., Teams, Excel, Chrome).

🔗

Logitech Flow

Move your cursor between two computers as if they were one screen — and copy/paste across them.

🖱️

DPI & Pointer Speed

Adjust mouse sensitivity from 200 to 8000 DPI. Set scroll direction, speed, and acceleration.

🔋

Battery Monitoring

See real-time battery percentage for all connected devices directly in the app.

🌐

Multi-Device Management

Pair both keyboard and mouse to a single Logi Bolt receiver and manage all devices from one dashboard.


🔗

Logitech Flow — Work Across Two Computers

Control two computers with one keyboard and mouse — seamlessly.

🚀

What is Flow?

Logitech Flow lets you move your mouse cursor from one computer screen to another — just like a second monitor. The keyboard follows automatically. You can even copy and paste text and files between the two computers.

1

Install Logi Options+ on both computers

Both computers must be on the same Wi-Fi network and have Logi Options+ installed and running.

2

Enable Flow in Logi Options+

Open Logi Options+ → Select your mouse → Click the Flow tab → Toggle Flow ON. Do this on both computers.

3

Move your cursor to the screen edge

Push the mouse cursor to the left or right edge of your screen. It will seamlessly cross over to the second computer.

💡 The keyboard automatically follows — start typing on the second computer immediately.
4

Copy & paste across computers

Enable Cross-Computer Copy & Paste in Flow settings. Use Ctrl+C on one computer and Ctrl+V on the other — it just works.


Essential Shortcuts & Tips

Quick reference for the most useful keyboard and mouse shortcuts.

ShortcutActionWorks On
Fn + EscToggle F-Keys ↔ Media KeysWin & Mac
Easy-Switch 1/2/3 (hold 3s)Re-pair to a new deviceWin & Mac
Easy-Switch 1/2/3 (short press)Switch to paired deviceWin & Mac
Fn + F3Open Emoji PickerWin & Mac
Fn + F5Spotlight / Windows SearchWin & Mac
Fn + F4Mission Control / Task ViewWin & Mac
Fn + SpaceAdjust backlight levelWin & Mac
Fn + F8Play / Pause mediaWin & Mac
Fn + F10Mute / Unmute volumeWin & Mac
ControlActionCustomisable?
Scroll wheel (slow)Line-by-line scrolling (ratchet)Yes
Scroll wheel (fast)Hyper-fast free-spin scrollingYes
Mode Shift buttonToggle scroll mode manuallyYes
Thumb wheel (left/right)Horizontal scrollYes
Gesture button + move ↑Show all windowsYes
Gesture button + move ↓Show desktopYes
Gesture button + move ←Previous workspaceYes
Gesture button + move →Next workspaceYes
Back / Forward buttonsBrowser back/forwardYes
Easy-Switch (hold 3s)Re-pair to new deviceNo

Team Setup Checklist

Click each item to mark it complete. Share this page with your team!

Setup Progress 0 / 15

Frequently Asked Questions

Common questions from new users — click to expand.

Try these steps in order:

  • Ensure the device is turned ON (check the ON/OFF switch).
  • Hold the Easy-Switch key for 3 seconds to re-enter pairing mode (LED should blink rapidly).
  • If using Bluetooth, remove the device from your computer's Bluetooth list and re-pair from scratch.
  • If using Logi Bolt, try a different USB port. Avoid USB 3.0 ports (blue) — use USB 2.0 (black) if possible.
  • Ensure the battery is charged — a flat battery can prevent pairing.

Pair your work PC to channel 1 and your laptop to channel 2. Then simply press the Easy-Switch key (1 or 2) on both the keyboard and mouse to instantly switch. The switch takes less than a second.

  • MX Keys: Up to 10 days with backlighting on, or up to 5 months with backlighting off.
  • MX Master 3S: Up to 70 days on a full charge. Just 3 minutes of charging gives a full day of use.

No — both devices work out of the box without any software. However, Logi Options+ unlocks significant extra functionality: button customisation, app-specific profiles, Flow, gesture configuration, DPI adjustment, and battery monitoring. It is strongly recommended for all team members.

Yes. Both devices are fully compatible with Windows, macOS, Linux, iOS, and Android. The MX Keys automatically adjusts key labels — Windows-specific characters appear on the right side of keys, macOS characters on the left. Logi Options+ is available for both Windows and macOS.

Open Logi Options+, select your MX Master 3S, and navigate to the Point & Scroll tab. You can adjust pointer speed (DPI) from 200 to 8000, scroll direction, scroll speed, and thumb wheel behaviour.

Yes, this is intentional. The MX Keys has a built-in proximity sensor — the backlight turns off when your hands move away and turns back on when they approach. The ambient light sensor will also disable backlighting in bright environments to conserve power. You can adjust backlight behaviour in Logi Options+.

Logi Bolt uses a proprietary 2.4 GHz wireless protocol that is more secure and more resistant to interference than standard Bluetooth — especially important in offices with many wireless devices. It requires the nano USB receiver to be plugged in. Bluetooth requires no extra hardware but may be slightly less stable in crowded wireless environments. For most office setups, Logi Bolt is recommended.